How to Upload Videos From Sony A6300 to Computer


Setting Up a Sony a6300 4K for Long Podcast Recordings
How-NOT-to Set up Your Camera for Podcasting
Beginning mistake was recording RAW to my Retentiveness Card
thirty minutes before our first Call To Action Podcast interview, that we were also recording on my Sony a6300 4K for our YouTubechannel, the retentivity card took a dump on me. To say the least, I was sweating profusely and extremely nervous at this betoken. Our guest was 15 minutes from arriving to the role and I felt as if I had already blown my podcasting career. I know dramatic, merely Ben (that's me) was off to a bad start.

Luckily my co-host, Keith, who is too my business partner and an award winning software engineer, had a last second thought. He literally hacked my retentivity card and within 2 minutes we were back in business concern. Not 5 minutes later our guest showed upward and although the interview went really well, the video simply captured sixty% of information technology...
I needed a better solution.
How-TO Prepare a Sony Camera for Straight Capture to Your Laptop
I asked myself later than night probably the same questions y'all are having right now like:
*"How can I tape my Sony camera directly to my computer?"* *"How do I get more than 30 minutes of recording out of my Sony a6300?" * *"What complimentary software programs can I use to direct capture from the camera to my laptop?" * Don't you lot worry, I hitting the interweazle hard and here's an all inclusive Step-by-Footstep guide on how to correctly set upward your Sony a6300 photographic camera for success. It'southward not difficult and should only accept y'all 30 minutes or less.
Step 1: Maximize Your Sony's Record Time
The Sony a6300 4K, as many of the other Sony cameras, are neat for photography and for short-form content cosmos nether 25-30 minutes. Anything by that 30 minute limit and the Sony starts to overheat and has an automatic close-off feature to protect the integrity of the internal hardware. This is really frustrating when you want to tape a podcast or live-stream.
I found a style to unlock your Sony'due south default settings to allow me to record my hour and a half to ii hour podcast recordings. That1CameraGuy has a surprisingly easy step-by-pace process to unlocking the tape limit. As I had to do, you will need to install an app onto the camera chosen OpenMemories Tweak and follow his easy guide. And then come up on back here and we'll get you set for your live stream or podcasting recordings to your camera.
Side note, his website says unlimited tape fourth dimension, but I've tested this many times and I've just been able to get 1.five hours straight at 1080p and about 35 minutes at 4K before it stops because of overheating. And so far what we've been able to practise is have a 30 second intermission, restart the recording and can go another xxx-45 minutes of recording before it overheats again. #nbd
Quick Overheating Tip: go out all of the doors and latches open on the photographic camera to let equally much heat to escape and human action every bit natural cooling. This would include the battery door, the digital screen pulled out abroad from the camera body, the flash component up and the charging/HDMI port door open (although this will already need to be open for your cables).
Pace two: Camera Settings For Long Podcasting or Alive Streaming
Now that you accept unlocked your camera for long record times, you need to set up the camera's settings for the best video quality.
If you lot are going to upload to YouTube, it only accepts standard 1080p quality videos so here are the maximum quality settings. There is a mode 'manifestly' to get effectually this, but I haven't tried information technology. Hither's the Phone call To Action Podcast settings:
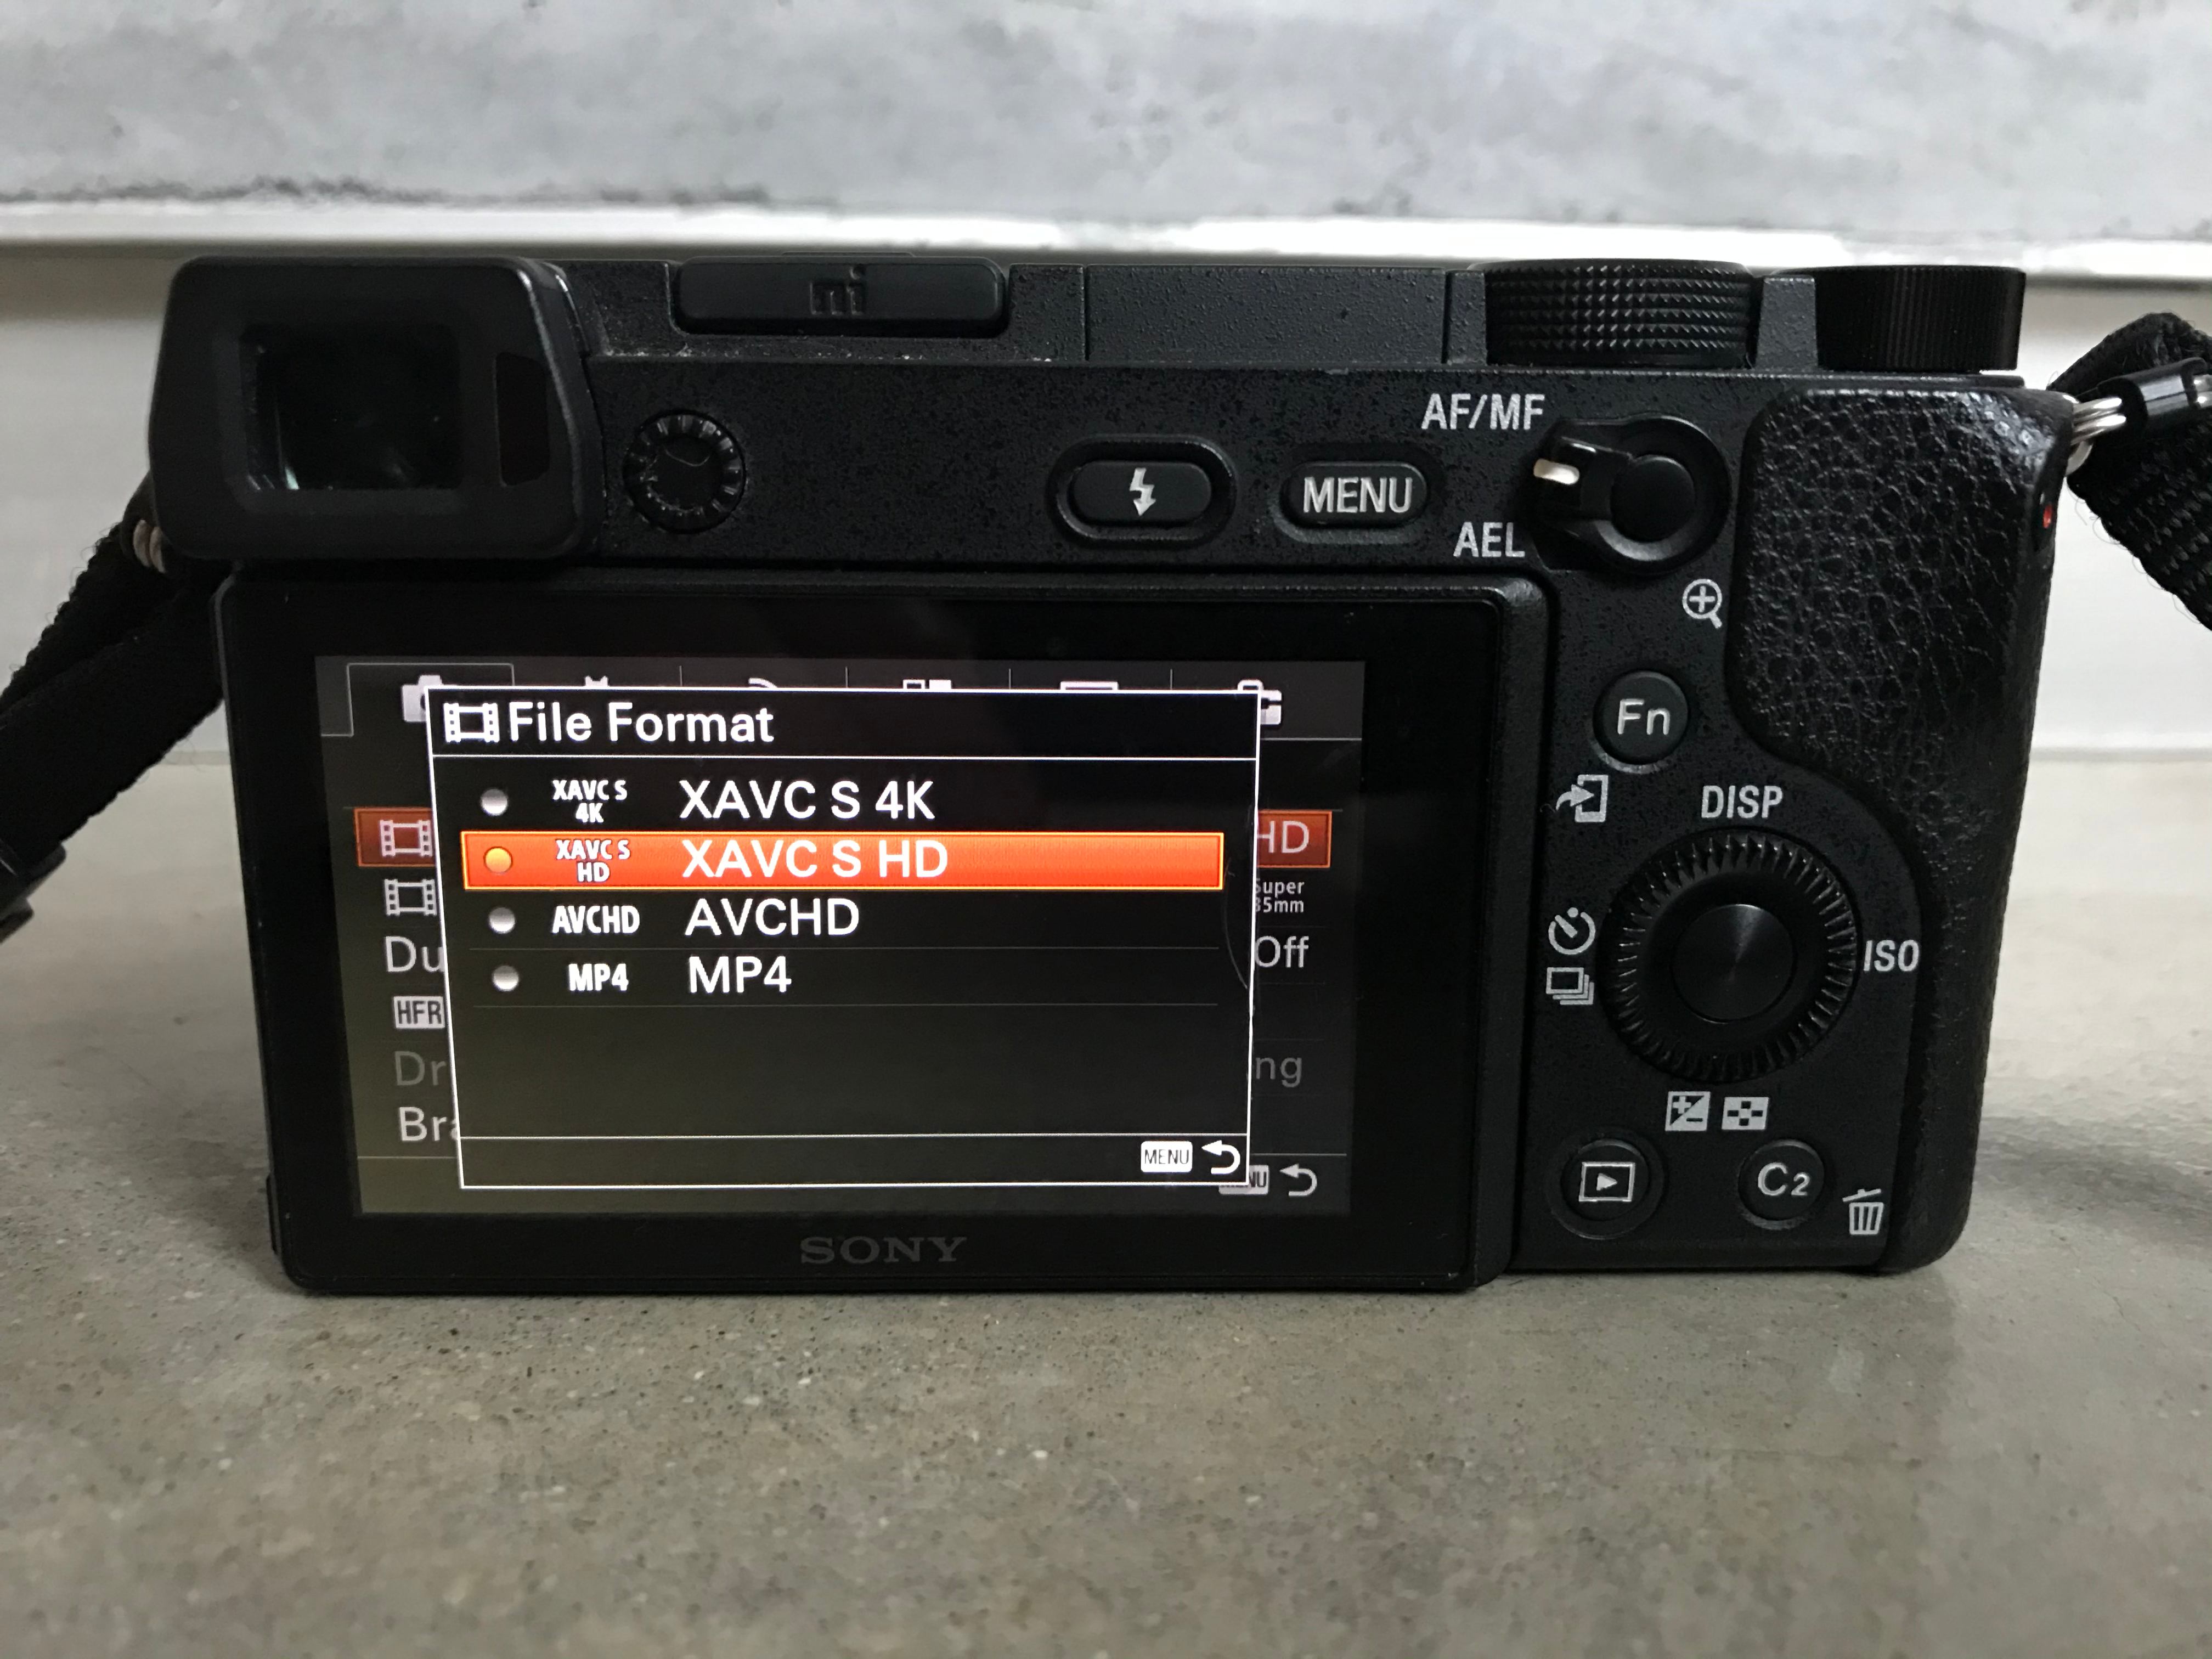
Get to Carte button > Camera Icon > 2 > File Format and set to XAVC S HD >
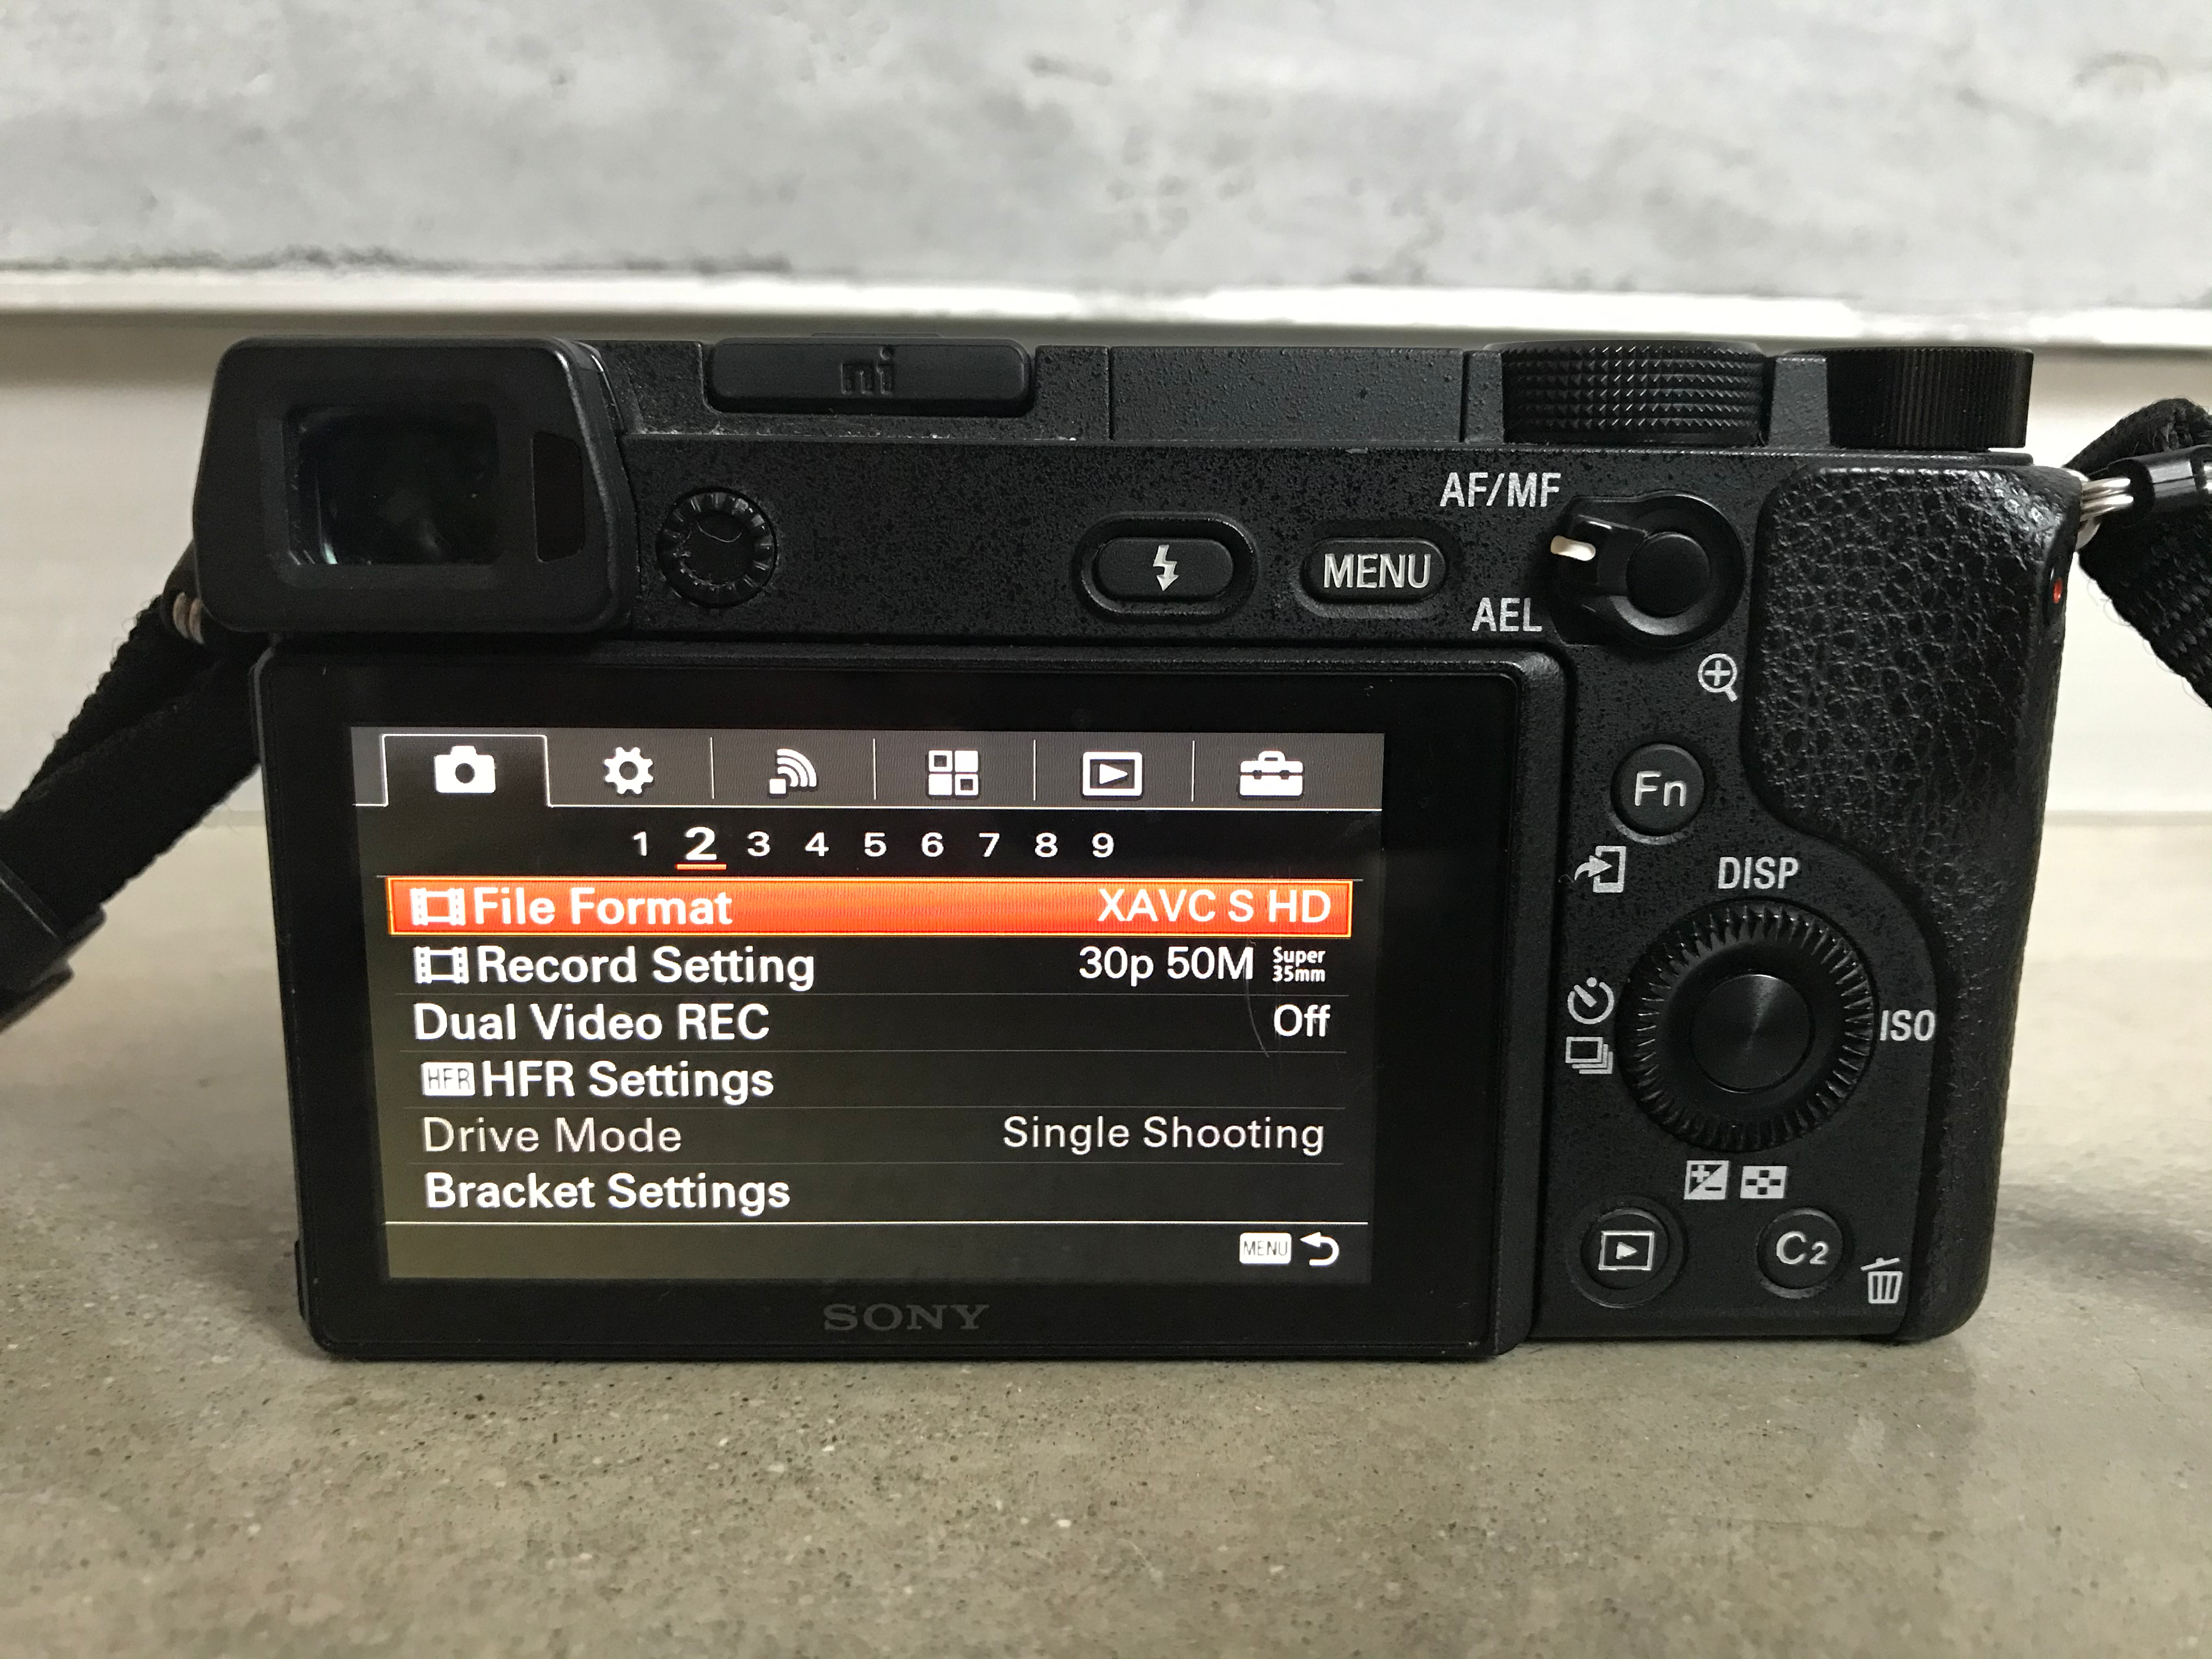
so right beneath is the Record Setting > Fix to 30p 50M (1080p at 30p is sufficient for a standstill podcast or live stream - this stands for Progressive and represents the number of frames per second - at 50M, which is the bitrate and essentially is they quality that your camera is capturing and storing your video. The higher the bitrate, the higher quality video. Y'all could go lower to 24p 50M, but Call To Activity is all about effective premium experience!)


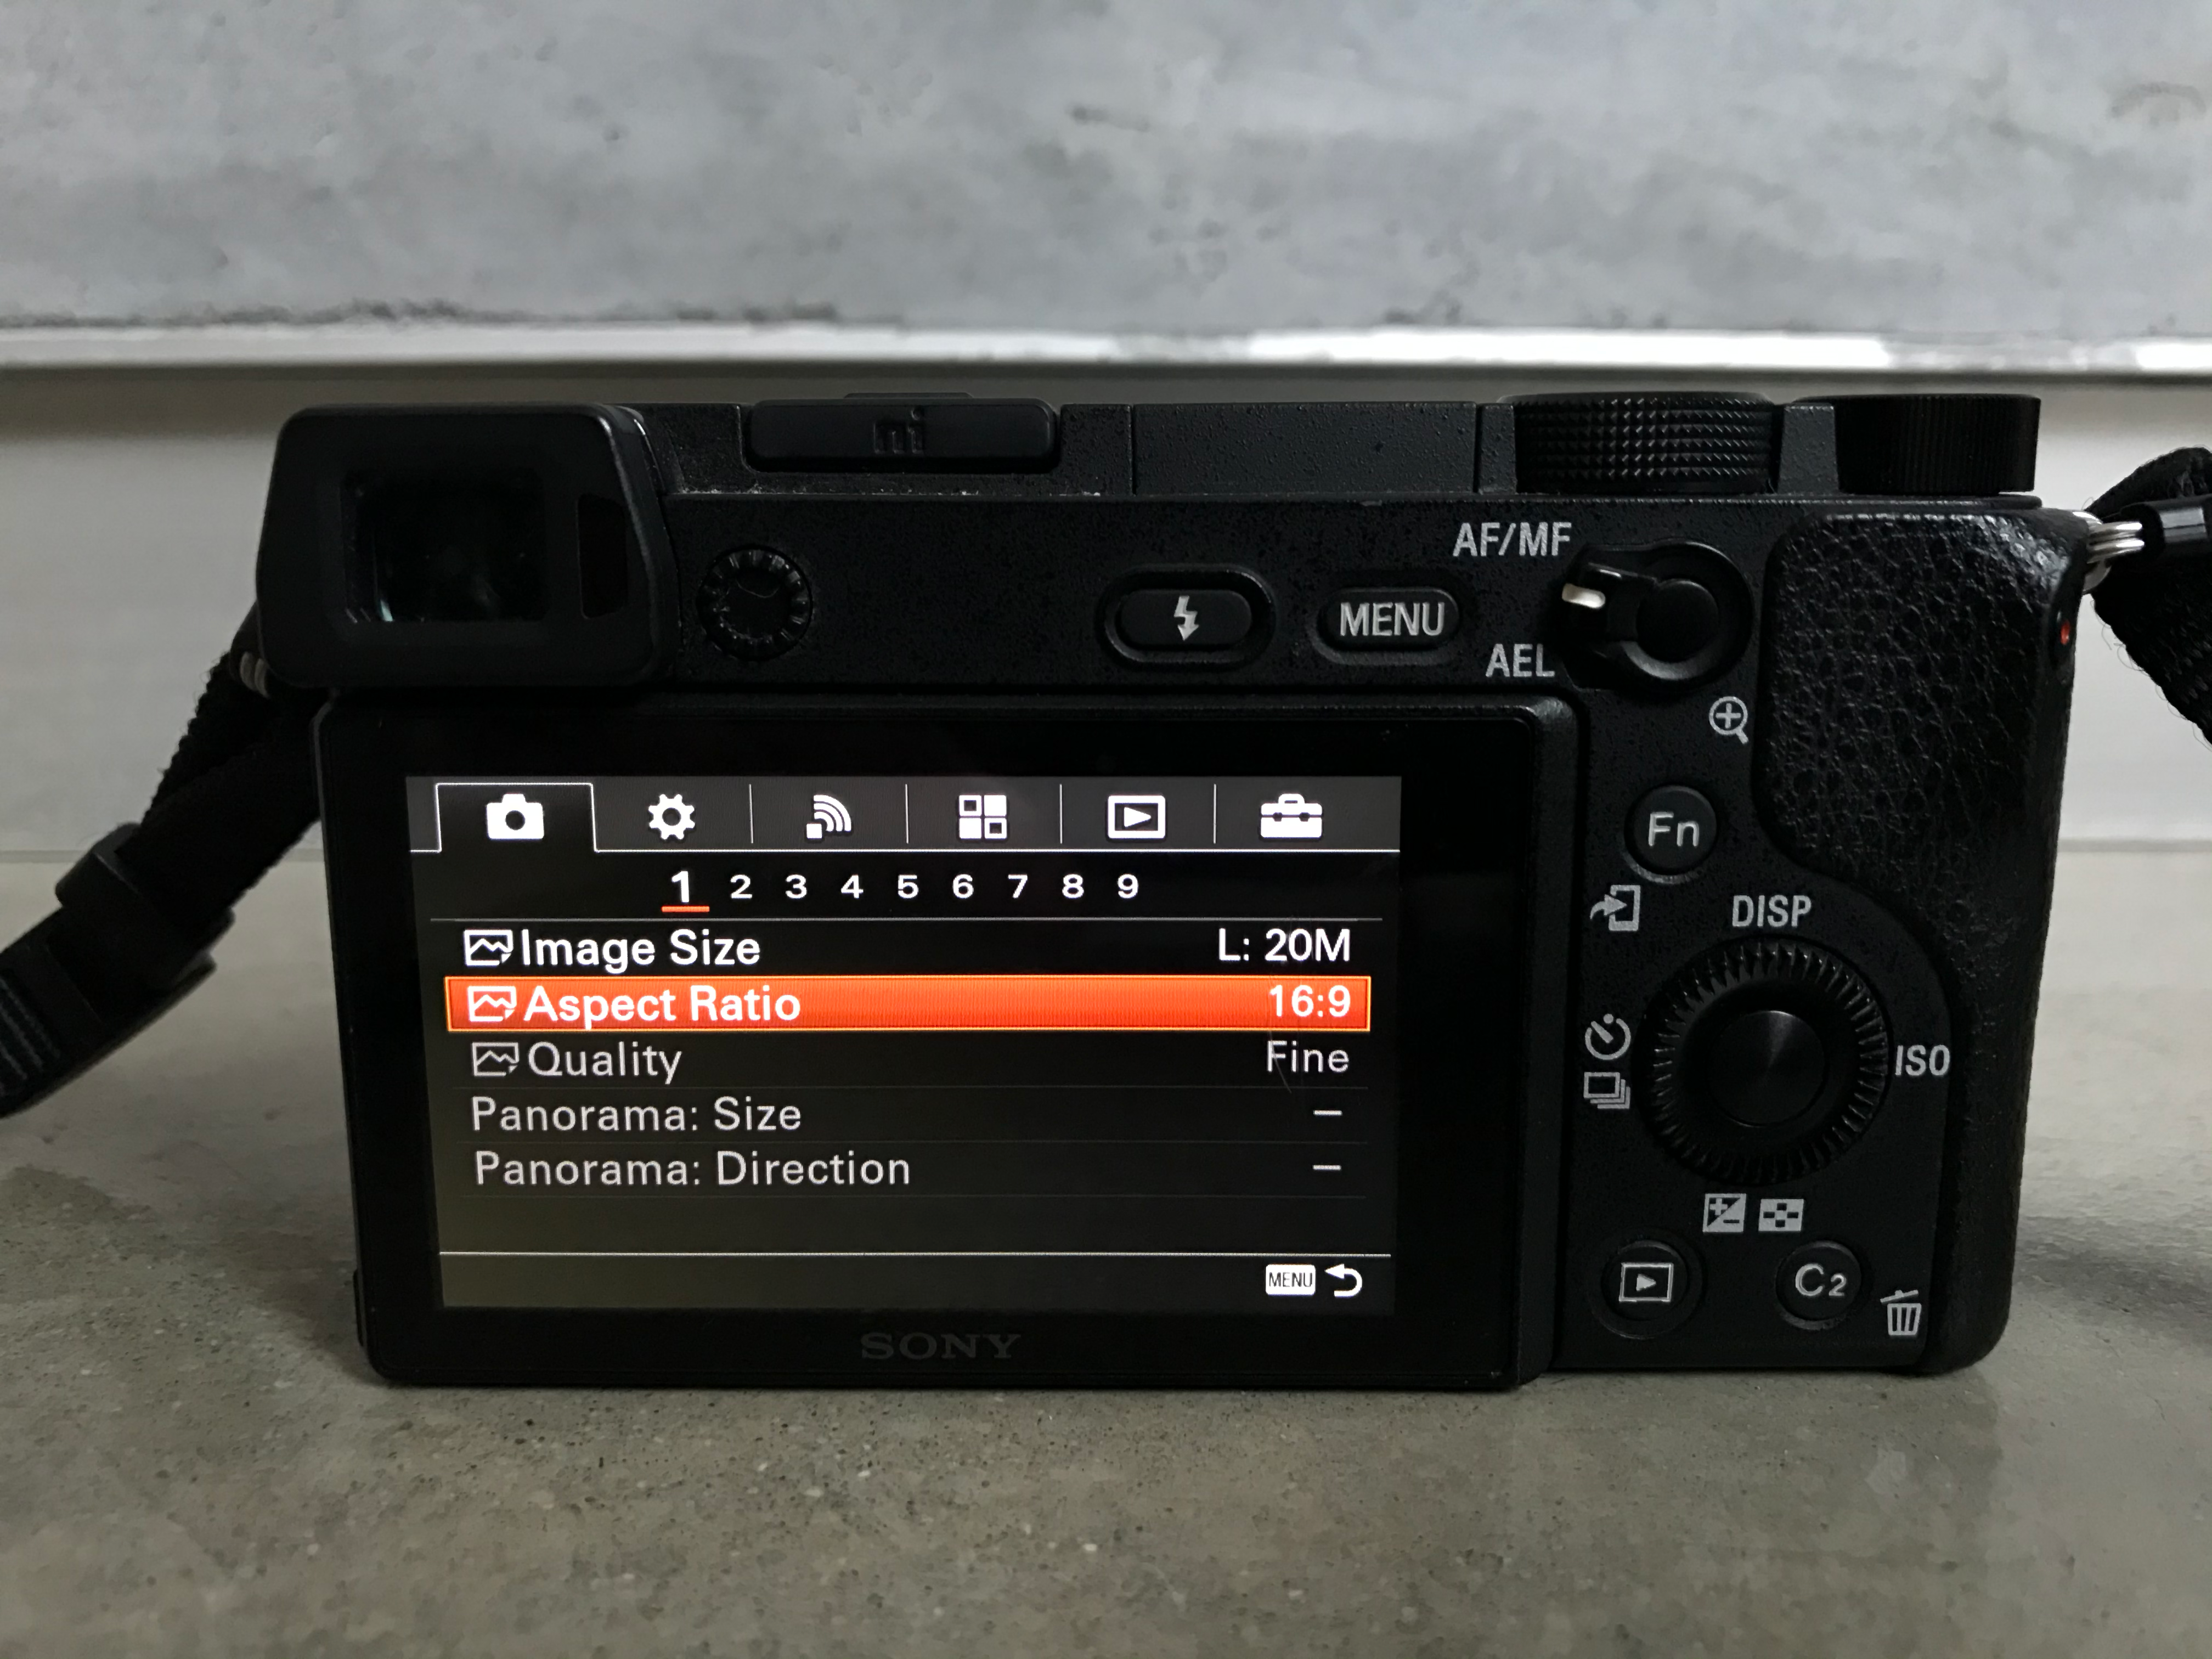
If you are recording for YouTube, yous'll also want to switch the aspect ratio:
Go to Carte du jour button > Camera Icon > 1 > Aspect Ratio 16:9
Step 3: Connect Sony a6300 4K Photographic camera for Straight Capture to Laptop
Direct capture is wonderful for saving storage to your laptop rather than a hard drive. It's more reliable and the better selection for podcasting and live-streaming. You are going to demand a few pieces of hardware.
1. Nosotros use a Magewell to USB Capture Dongle ($299) - the Magewell is a vital component to getting the video onto your laptop reckoner. Th video signal needs to be converted to a format adequate to your laptop. In that location are cheaper options like the Elgato Cam Link ($110), but we use a much higher quality Dongle two. 'Micro' (NOT 'Mini') HDMI to full HDMI cable that volition run from the Magewell to your Sony camera three. MacBook Pro (or whatever laptop you'll be using) Optional Hardware for the Professional Look
1. Zomei Tripod Q555 ($65) 2. Gobe Neutral Density Filter ($53) three. Neewer 660 ii- Pack LED Panel Lights ($158) Optional Sound Equipment for Professional Sound (we volition be posting a blog on sound engineering science for podcasting or live streaming like a pro)
i. Rode Anniversary Condenser Microphone ($212) 2. Bluish Compass Blast Arm ($99) 3. Behringer Audio Interface four Channel ($135) - even if you have one host and one invitee, just get the 4 channel 'incase' you lot go a 3rd or along person. Only connect the Micro HDMI into the Sony a6300, the full HDMI side into the Magewell Dongle, the USB that comes with the Magewell from the Dongle to your calculator (if yous have a new MacBook with a USB C - thanks Tim Cook - you'll demand to merely USB 3 to USB C converters for $3), and this leads to the final footstep…
Step iv: Quicktime or Skype To Video Capture
At present that you accept your camera connected, turned on and gear up for recording the final pace is to use the costless software y'all already have on you MacBook Pro, Air, etc. All you need to do is open Quicktime or Skype:
Go to File > New Movie Recording >
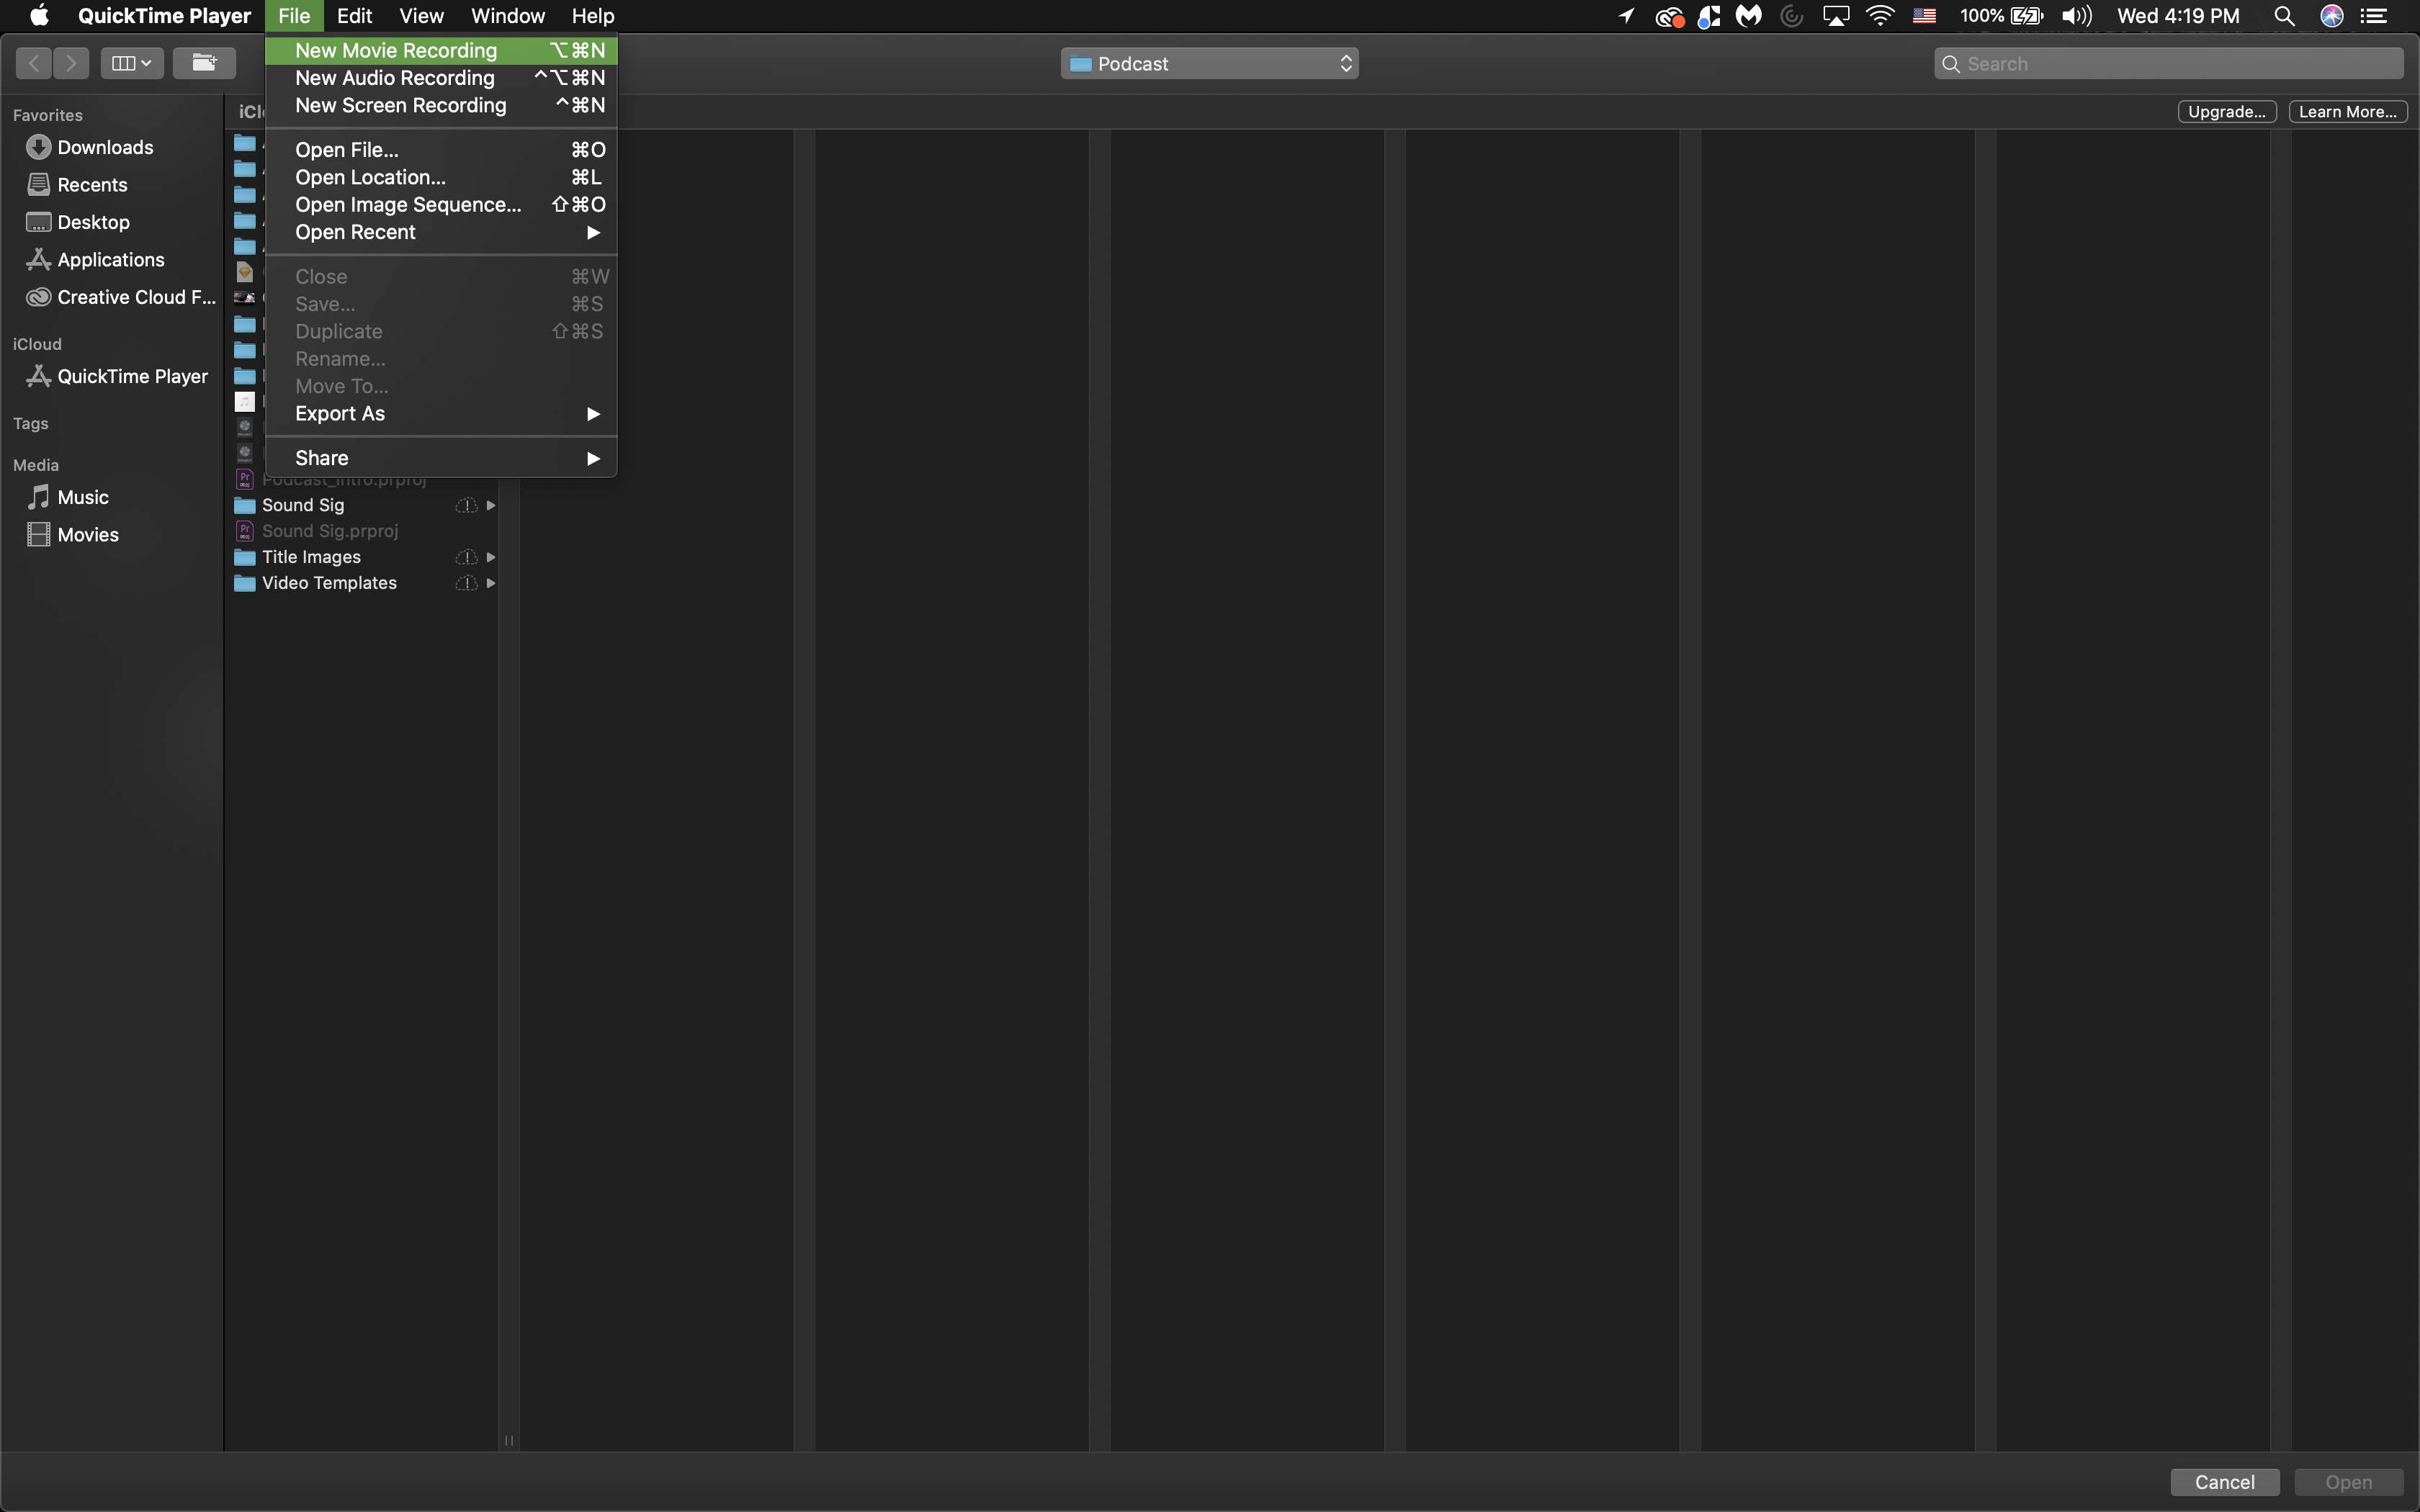
And then click the arrow to the right of the 'Red Record' push button and set Camera to the HDMI Capture, which is your Sony a6300 input and yous're good to go!

It is that easy. We are going to be posting a YouTube video with a step-by-step visual how to do all of this and will be uploading that before long. For now, you're all prepare and if you have whatsoever questions, feel gratuitous to electronic mail usa at [electronic mail protected].
A little bit of technique and preparedness goes a long mode. I've made all of these mistakes so you lot don't have to.
Happy Podcasting!
Source: https://dimensionsoftware.com/call-to-action/2019/11/podcasting-camera-setup
0 Response to "How to Upload Videos From Sony A6300 to Computer"
Post a Comment